A MiddleWeb Blog
![]()
The new school year is on the horizon, and you’re going to be caught up in the whirlwind of preparation that precedes this year’s classroom adventures.
As you get ready to engage students in exciting STEM lessons, be sure to keep these five STEM lesson principles upfront and personal.
1. Know the content and big ideas for the lesson.
 You’ll be integrating science and math content in your STEM lesson, so be sure you know the content for each area well. Your success as a STEM teacher, and consequently your students’ learning, will depend to a great extent on how well you understand the subject matter.
Math teachers designing STEM lessons often need to dig deeper into the science content, and science teachers need to understand the grade-level math components. The best possible learning method is for math and science teachers to study and learn together with a STEM lesson in mind. Ongoing collaboration will also help those new teaching practices to stick over time.
2. Keep it real.
The integrated STEM learning approach focuses on combining knowledge from science, technology, engineering and mathematics to solve real-world problems. Suppose you encounter a lesson that involves kids in solving an insect infestation problem involving imaginary insects. Insect infestation may a real problem, but an infestation of mythical insects is not real. This isn’t a STEM lesson.
In my science classes I sometimes used imaginary creatures to generate interest. When studying the rock cycle, my students drew a comic strip about the life story of Sandy Sediment – a mythical grain of sand. But I was not leading a STEM lesson. In STEM lessons the problems and issues being addressed are real ones. Mythical insects and imaginary life forms are not real 21st Century problems (at least, as far as I know). So your STEM lesson should avoid imaginary problems and characters.
3. Understand the role of criteria and constraints in your STEM lesson.
 STEM lessons spell out criteria and constraints that students must meet when designing solutions for a specific problem. Simply put, criteria identify the ways students will define success for their prototypes and inventions. (In some classes, students may participate in determining the criteria and constraints.)
Criteria example: In one lesson teams designed model clot catchers to prevent blood clots from traveling to the lungs. Their clot catchers had to meet four criteria: (1) Catch model blood clots and hold them; (2) stay in place in the model vein; (3) stay together in one piece; (4) allow the blood to keep flowing. Teams used a rubric to evaluate their clot catchers according to the criteria.
Constraints refer to limitations that teams must observe when designing solutions. For example they may have to limit its size or weight. They may have to consider safety factors or environmental impact. One constraint they generally have is the availability of materials. Prepare to help students clearly understand the role of criteria and constraints as they design.
4. Be thoroughly comfortable with the Engineering Design Process (EDP).
I’ve mentioned the EDP in previous posts, but the EDP is truly the heart of your STEM lesson. Let’s do a quick review of EDP steps I use with middle schoolers. These steps don’t have to occur in any particular order. Engineers regularly go back and forth between steps when working on solutions.
Define the Problem: This is the specific engineering challenge that students will address. In this step, the students identify and clarify the problem.
Research: Team members gather needed information about the problem from written material, hands-on investigations, videos, interviews, and in a number of different ways.
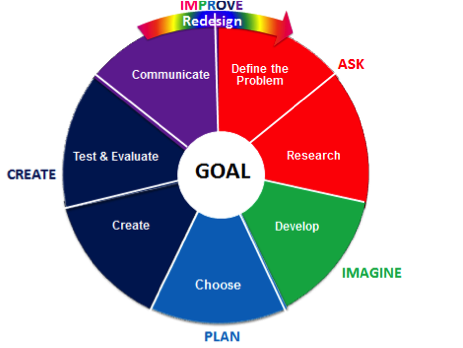 Develop: Team members brainstorm many informed ideas about how to solve the problem. They think outside the box and imagine a lot of creative options.
Choose and Plan: Team members choose the idea they think will work best and plan how they will design their prototype. They make a specific design plan and sketch. If they have trouble reaching consensus, they use teamwork skills such as active listening, respect, and trade-offs.
Create: Team members build their prototype. All team members play an active role and share responsibilities.
Test and Evaluate: Teams test their prototypes to determine how well they solve the problem. They evaluate them based on how successful they were in meeting the criteria. It’s okay if the prototype doesn’t work because team members can learn from this and correct their design problems in the next version they construct.
Communicate: Team members share specifics about the problem, their designed solution, and the results. They can do this in a variety of ways, including written communication, speech and drama, digital tools, photographs, or other methods.
Redesign: Teams decide how to improve their prototype and redesign it. Team members may synthesize information from their test results and those of other teams to help them decide how to improve their device. This may occur at several stages during the lesson.
5. Know how to teach a STEM lesson.
 I touched on this recently in this post on summer planning, but it bears repeating: before leading a STEM lesson you need to have a good grasp of the kind of teaching and learning STEM classes require.
Students’ work is hands-on and collaborative, and decisions about solutions are student-generated. During the lesson team members make careful observations, develop prototypes, synthesize data, and make informed decisions to guide their redesign. These are not traditional teacher-driven practices: they are student-centered, inquiry-based practices.
On your mark…
So with those basics in mind, get ready to tackle leading STEM lessons. And remember, don’t be afraid of what you don’t know. You do not need to enter the STEM education world as an expert in all things STEM. You just need to be a keen observer, a good learner, and a teacher who knows what the students need to gain from STEM lessons.