School Leadership 2.0
A Network Connecting School Leaders From Around The Globe
4 Fun Ways to Practice Short Oral Presentations
4 Fun Ways to Practice Short Oral Presentations
BY MIDDLEWEB · PUBLISHED 07/17/2018
When our book The ELL Teacher’s Toolbox was published this spring, the KQED MindShift blog published an excerpt titled “How to Use Oral Presentations to Help English Language Learners Su... MiddleWeb asked to share our tips for short presentations that appear in the book right after this excerpt.
You might find it helpful to read both posts. We think our strategies for ELL students can be adapted for any group of students working to improve speaking and listening skills. ~ Larry & Katie
By Larry Ferlazzo and Katie Hull Sypnieski
Most of the time , we have our ELL students make short oral presentations to a group or a partner because it is more practical, time efficient, and energizing for students. Here are some ways we have students practice making short presentations.
Speed Dating
Speed dating is a quick way for students to present their work to classmates while gaining speaking and listening practice. The teacher divides students into two rows facing each other (students can be standing or seated in desks).
One row is assigned as the movers. The teacher tells students the amount of time each partner will have to speak (this depends on the length of what they are sharing). When time is up, the teacher says “switch” and the mover row stands and moves one person to the right. This can be done several times so that students can present to multiple partners. (When the movers shift, one person in the stationary row will be without a partner. Have that person move to the other end of their row.)
Students can share their work in different ways (e.g., by sharing specific parts of a mini-poster or explaining something they’ve written). To boost listening skills, we often require students to ask a question after their partner presents (sometimes providing question and answer frames).
The previous paragraphs describe individual presentations. An easy way to do speed dating after students have worked in groups to prepare joint presentations is to assign half the groups to different parts or corners of the room (they become the stationary groups). Each remaining group (who will be the movers) is assigned to start with a stationary group partner. After each of the paired groups makes its joint presentation to the other, the mover group rotates and the process repeats itself.
Talking Points Presentations
This activity is a fun way for students to practice the presentation skill of speaking from their notes, not reading from them.
In this activity, the teacher first asks students to generate a quick list of topics they know a lot about (we often have students consult their heart maps or writing territories, which are discussed in Strategy 18 of our book, “Writer’s Notebook”).
Students then choose one topic to write about for several minutes—writing anything they know or that comes to mind. The teacher can model the same process on the document camera with a topic of his or her choice.
After writing, the teacher shows students how they can use this quickwrite to create several talking points or categories by looking for ideas that they can expand upon from their original writing. For example, if they wrote about Disneyland then the categories might include “my favorite rides,” “my best memory at Disneyland,” “my worst memory at Disneyland,” or “my favorite Disney character.”
Students then choose three of their categories and draw a quick picture representing each one. For the Disneyland example, Katie modeled drawing a picture of the submarine ride, a picture of her throwing up after going on Star Tours, and a sketch of Minnie Mouse!
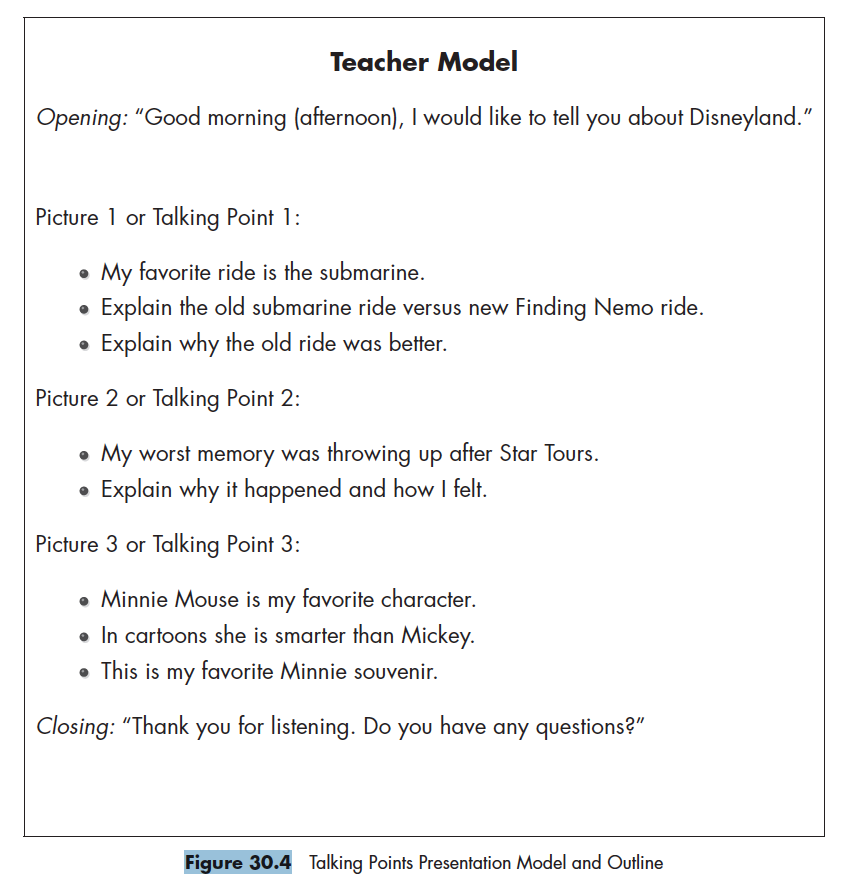
The teacher then gives students a simple outline and models using it as an assist while speaking for a brief amount of time (no more than two minutes). See Figure 30.4: Talking Points Presentation Model and Outline for the teacher model and the outline we used for this activity.
The teacher reinforces the difference between reading the talking points (a don’t) and speaking from the talking points (a do). Students are then given time to practice presenting using the outline as a guide—an opening, talking about each picture (using the talking points as cues), and a closing.
Students can give their presentations in small groups or in pairs (preferably with different students than they practiced with). Depending on their English proficiency level and the amount of practice they’ve had, students may or may not need to look at their outline. Listeners can be tasked with thinking of a relevant question to ask the speaker at the end of their presentation.
Top Five Presentations
This activity involves students working in groups to develop a top five list based on their interests and then preparing a short presentation to share with the class. We were introduced to the idea by ELT specialist Clare Lavery in her British Council post “Short Projects to Get Them Talking.”
In our version of the activity, we put students in groups of three and give them a few minutes to come up with three to four topics they all find interesting. Sometimes students need a few ideas to get them started so we list some examples on the board (animals, sports, music, fashion, etc.).
 Then we tell students to select one of the topics – preferably the one they know the most about – and to develop a top five list for this topic. Some examples might be top five animals, top five sports cars, top five musical artists, or top five movies. Students then receive Figure 30.5: Top Five Outline (depending on the proficiency level of students, the teacher can choose to include or not to include the sentence frames).
Students use the outline to develop their presentation ideas – to list their choices for the top five in their topic and to explain why they believe each one belongs in the top five.
We’ve found it is also helpful and enjoyable for students to create a visual aid to further communicate their points. In the past, students have created top five posters and five to seven slide PowerPoints. Students have also incorporated songs and movie clips into their presentations. We usually give groups a speaking time limit of three minutes with the requirement that each person in the group must speak during the presentation.
Students are then given time to practice their presentations. It might be necessary for the class to review our dos and don’ts for speaking and listening. The presentations can be done in front of the whole class or small groups can be paired up and present to each other. Listeners can be asked to provide feedback on a sticky note (writing something they liked about the presentation or a question they had).
PechaKucha Book Talks
PechaKucha (“chit-chat” in Japanese) is a popular presentation format in which 20 slides are shown for 20 seconds each (20 × 20) – about six and a half minutes. The slides, which usually contain one to two images and minimal text, are programmed to advance automatically as the speaker talks along with them.
In other words, each slide is used as a background or visual cue as the speakers progress through their presentation. Many language teachers use the PechaKucha presentation format because it can be easily modified. PK presentations have several advantages for ELLs—they are short, structured, highly visual, and informal.
Students can use the PechaKucha format to develop presentations on basically any topic. Teachers can adjust the time format if they want to give students more time on each slide or have students present fewer slides (e.g., 10 slides × 30 seconds each).
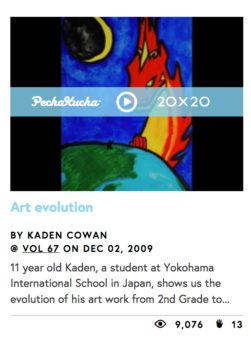
 EDITOR’S NOTE: You can find many, many examples of PechaKucha presentations at the official PechaKucha website, all presented in the standard 20×20 format. Students might enjoy seeing an example. This one, by an ornithologist with a sense of humor, is titled “What, If Anything, Is Big Bird”. Best of all, the website features a small collection of presentations by kids from around the world, some in English. A good choice might be this one by 6th grader Kaden talking about the evolution of his drawings.
One variation of Pecha Kucha we’ve used in our classes was introduced to us by educator Anthony Schmidt in his helpful blog post “The Power of PechaKucha.” His modified version has students create a short PechaKucha presentation on a book they’ve read. We often have students do book talks with a partner and this is a great way to give those a different spin. Here is the outline Anthony used with his intermediate students:
Five Slide PechaKucha (2:40)
- Slide 1—10 seconds: Introduction, title of book
- Slide 2—60s: Plot, summary
- Slide 3—30s: Favorite scene, character, part
- Slide 4—60s: Evaluation and recommendation
- Slide 5—0 s: Thank you
We provided our students with this outline. Students then created their slide presentations about their books. They selected online images based on a key idea for each slide (e.g., one student chose an image of the cover of his book for Slide 1 and an image of a gold medal for Slide 4).
Because we had beginners and intermediates, we gave students the option of using sentence frames to write their notes for each slide and posted them on the front board (e.g., “The title of my book is.” “I recommend this book because.” ).
Students then printed out a copy of their PowerPoint to use for practice and sent them to us. We had one or two students present their PechaKucha book talks each day over the course of a few weeks.
Short presentations build confidence
Short presentations help us meet our goals of teaching students to develop and deliver effective oral presentations, providing them with lots of practice, and enabling them to feel empowered, not overwhelmed, by the experience.
 Larry Ferlazzo teaches English, social studies, and International Baccalaureate Theory of Knowledge classes to English Language Learners and mainstream students at Luther Burbank High School in Sacramento, California. He has written eight previous books and has won numerous awards, including the grand prize from the International Literacy Association for Technology and Reading. Visit Larry’s globally recognized education resources website and follow him on Twitter @larryferlazzo.
 Katie Hull Sypnieski has worked with English Language Learners for 21 years in the Sacramento City Unified School District. She currently teaches middle school English language arts and English language development at Rosa Parks K–8 School. Follow Katie on Twitter @KHullSyp.
 Ferlazzo and Hull Sypnieski are coauthors of The ELL Teacher’s Toolbox: Hundreds of Practical Ideas to Support Y... (2018) from which this article is adapted. They have also co-authored The ESL/ELL Teacher’s Survival Guide and Navigating the Common Core with English Language Learners, all from Jossey-Bass/Wiley.
JOIN SL 2.0
SUBSCRIBE TO
SCHOOL LEADERSHIP 2.0
Feedspot named School Leadership 2.0 one of the "Top 25 Educational Leadership Blogs"
"School Leadership 2.0 is the premier virtual learning community for school leaders from around the globe."
---------------------------
Our community is a subscription-based paid service ($19.95/year or only $1.99 per month for a trial membership) that will provide school leaders with outstanding resources. Learn more about membership to this service by clicking one of our links below.
Click HERE to subscribe as an individual.
Click HERE to learn about group membership (i.e., association, leadership teams)
__________________
CREATE AN EMPLOYER PROFILE AND GET JOB ALERTS AT
SCHOOLLEADERSHIPJOBS.COM
New Partnership
Mentors.net - a Professional Development Resource
Mentors.net was founded in 1995 as a professional development resource for school administrators leading new teacher induction programs. It soon evolved into a destination where both new and student teachers could reflect on their teaching experiences. Now, nearly thirty years later, Mentors.net has taken on a new direction—serving as a platform for beginning teachers, preservice educators, and
other professionals to share their insights and experiences from the early years of teaching, with a focus on integrating artificial intelligence. We invite you to contribute by sharing your experiences in the form of a journal article, story, reflection, or timely tips, especially on how you incorporate AI into your teaching
practice. Submissions may range from a 500-word personal reflection to a 2,000-word article with formal citations.


You need to be a member of School Leadership 2.0 to add comments!
Join School Leadership 2.0